Creating User-Friendly Documentation
Welcome to a deep dive into the art of technical writing! We’ll unravel the secrets behind crafting user-friendly documentation for end users of software. This post will delve into key methods for structuring, formatting, and writing documentation and step-by-step instructions, ensuring that users not only engage with the content but can easily digest and conveniently navigate it. Let’s dive in!
It’s especially common for technical writers to create instructions or training documents that help users learn and use software. These materials, known by various names, all serve as documentation—content aiding users in accomplishing tasks, solving problems, or understanding a product swiftly and accurately. This type of content is replete with instructions, procedures, steps, and explanations. And, let’s be clear, users aren’t reading this like their favorite Nicholas Sparks novel; they’re dreading reading your documentation. Make it easy for them to get the information they want quickly and effortlessly, ensuring they can perform whatever task they need to do with ease.
For instance, many technical writers author and manage online help sites embedded in software products. (Have you ever seen that little question mark button in a program or application? That’s what opens online help!) A software’s help site offers a comprehensive and structured overview for understanding, using, and navigating the software. This includes easily navigable help topics and articles explaining product features and usage.
This article examines 14 fundamental, specific, and practical methods for creating successful instructional documentation, along with their advantages and examples.
- Creating User-Friendly Documentation
- Structuring & Simplifying Instructions
- Language & Style
- References
Structuring & Simplifying Instructions
In this section, we will cover techniques for formatting and organizing step-by-step instructions for end-users navigating software. The goal is to create content that is easily navigable, digestible, and visually accessible.
Structuring Help Topics
In technical writing, a help topic is a self-contained unit of information designed to guide users through specific tasks or procedures within a software application or system. Each help topic typically revolves around a single task or concept and is structured to provide clear and concise instructions for users to follow. Additionally, these topics are often organized within a help system or knowledge base, allowing users to easily access relevant information when needed.
Here are the basic parts to shaping a help topic:
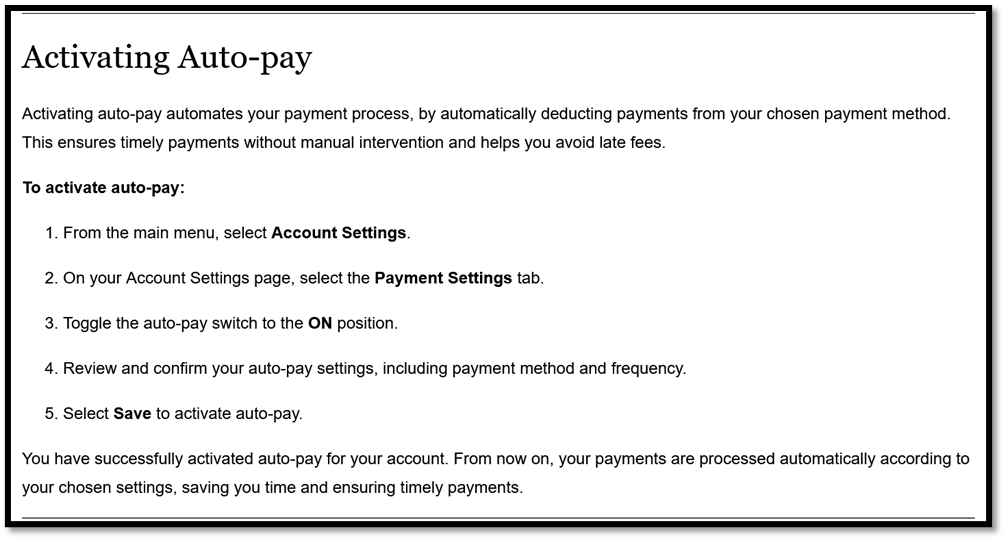
- Title: The title of a help topic serves as the user’s first point of contact, guiding them to the information they seek. It should be precise and descriptive, accurately summarizing the task at hand.
- Introduction (Context): Each help topic should commence with contextual and introductory language, providing users with essential background information. This introductory text serves a dual purpose: elucidating what the task accomplishes and why or when it holds significance for the user. By contextualizing the task in this manner, users gain a clearer understanding of its relevance and purpose within the software ecosystem.
- Body (Instructions): This is where the step-by-step instructions are included, typically in a numbered list. The steps outlined within the help topic should focus on the practical aspects of task completion—and should be clear, concise, and actionable, addressing how and where the user can perform the task effectively. By following these structured steps, users can navigate the software with confidence, knowing precisely how to execute the desired action.
- Conclusion: Sometimes, a conclusive statement can be helpful because it reinforces key points covered in the help topic and provides closure for the user. In this section, you can summarize the main steps or concepts discussed, reiterate the benefits of completing the task, and offer any additional tips or reminders. By concluding the help topic effectively, you leave users with a sense of accomplishment and confidence in their ability to apply the information they’ve learned.
Benefits
Promotes clarity, understanding, logic, consistency, relevance, and user engagement; saves time and motivates users with a user-centered approach, empowering them to accomplish tasks independently.
Example
Directing Users to Locations Before Actions
When writing step-by-step instructions, first direct users to the specific location within the user interface (UI) where they should perform the action. In the realm of technology, users often rely on precise guidance to navigate complex interfaces. By clearly stating where to perform an action before specifying the action itself, users can efficiently locate the designated area and proceed with confidence.
While many companies incorporate this practice into their style guides for consistency and clarity, its adoption can vary depending on the specific context and audience of the documentation. Some companies may prioritize this approach more heavily than others, especially those with a strong emphasis on user experience and usability.
However, regardless of whether it’s explicitly outlined in a company’s style guide, the concept aligns with broader principles of effective communication and user-centered design, making it a valuable technique in most technical writing contexts. Ultimately, its use may vary based on the specific needs and preferences of the target audience and the nature of the software or interface being documented.
Benefits
Enhances user navigation and efficiency; minimizes confusion and potential errors; and promotes user confidence and satisfaction.
Example

Limiting the Number of Steps: The 5–7 Rule
While planning step-by-step instructions, consider the cognitive load placed on users. The human brain can only hold a limited amount of information in working memory at once. Overwhelming users with a lengthy list of steps can lead to cognitive overload, hindering their ability to effectively complete tasks and discouraging them from doing so.
To mitigate this issue, try limiting the number of steps in a task to a maximum of 5 to 7. This approach aligns with cognitive psychology principles, as it ensures that users can easily process and retain the information provided. If a task requires more than about 5 to 7 steps, consider using sub-steps and headings, or break the procedure into manageable parts or sections.
Benefits
Reduces user cognitive load, promoting clarity and focus; enhances user experience by facilitating easier engagement and task completion.
Examples
Good:
Not so Good:

Breaking Long Procedures into Parts
As the previous section mentioned, when faced with lengthy procedures that consist of multiple parts or exceed the 5 to 7-step guideline, break them down into manageable parts. By dividing the procedure into clearly labeled parts or sections, users can better navigate through the instructions, reducing cognitive load and improving readability.
Breaking down a process into three sections, each containing five steps, is much less stressful than presenting 15 steps consecutively. When instructions are concise and organized into manageable sections, users are more likely to engage with and successfully complete tasks.
Benefits
Reduces cognitive load, simplifies navigation, improves readability, structures information, and aligns with task-based learning.
Example

Muti-Action Steps
It’s essential to provide clear instructions when guiding users through a software feature that requires quick menu selections or navigating through nested options. In general, aim for one step per action in your step-by-step instructions. If steps become too lengthy, consider breaking them down into smaller, multiple steps.
However, you can enhance the efficiency of the instructions by grouping small actions into a single step. Use angle brackets (>) to denote sequential menu selections. This technique is particularly helpful when users need to navigate through menus with multiple layers or drop-downs.
For example, when guiding users through a software feature with rapid menu selections or nested options, consider using multi-action steps to condense the process and make it more digestible.
Benefits
Reduces the number of written steps, consequently minimizing reading time and decluttering the documentation.
Examples


Sub-Steps
Sub-steps are supplementary instructions nested within the main steps, providing additional detail or clarification where needed. Here’s when and why you might consider incorporating sub-steps into your documentation:
- Complex Procedures: When a main step involves a complex procedure that can be further broken down into smaller actions, sub-steps can help users navigate through the process with greater ease. By breaking down intricate tasks into manageable sub-steps, users are less likely to feel overwhelmed and more likely to complete the task successfully.
- Clarification of Actions: Sub-steps are particularly useful for clarifying specific actions within a main step. If a main step involves multiple actions or decision points, sub-steps can provide detailed guidance on each individual action, reducing ambiguity and minimizing the risk of user error.
- Sequential Processes: When a main step consists of a sequence of actions that must be performed in a specific order, sub-steps can help users understand the sequence more clearly. By breaking down the process into sequential sub-steps, users can follow along step-by-step, ensuring they don’t miss any crucial actions along the way.
Benefits
Enhances clarity, reduces ambiguity, and promotes consistency, making instructions easier to follow and reference.
Example

Optional Steps
Optional steps in documentation present a tailored approach to meet your users’ diverse needs and individual preferences. Providing additional flexibility lets users customize their experience according to specific requirements.
Incorporating optional steps into your documentation not only tailors the user experience but also underscores your dedication to user-centric design. By presenting choices, you empower users to engage with the content according to their preferences, fostering a positive and adaptable user experience.
To seamlessly integrate optional steps into your instructions, one option is to clearly label them at the beginning of the step with the word Optional, surrounded by parentheses or followed by a colon. This straightforward labeling ensures that users can quickly identify steps they can choose to include or skip.
Benefits
Users can quickly identify optional steps and whether to include them in their workflow. This enhances documentation clarity by allowing selective engagement and reducing the need for unnecessary steps.
Example

Multiple Methods for the Same Task
Often, a software offers multiple pathways for completing a task. Instead of documenting every route available to users, make your life and the lives of your users easier by approaching this situation in one of three ways:
- Choose a Universal Procedure: Whenever possible, aim to document one procedure that is accessible to all users. This ensures consistency and simplifies the user experience, as every user follows the same set of instructions. In this case, choosing to document only one procedure also makes the life of the writer easier!
- Opt for Simplicity: If all available methods are accessible to users, prioritize the shortest and simplest approach. This minimizes confusion and streamlines the learning process for users, allowing them to achieve their goals more efficiently.
- Separate Procedures: In cases where it’s necessary to document multiple ways to complete a task, consider organizing them into different help topics, headings, or sections. This segmentation helps users easily identify the approach that best suits their needs without overwhelming them with unnecessary information.
Benefits
Maintains clarity and concision; simplifies the user experience; reduces the risk of information overload.
Using Drop-Down Menus
Help authoring software products such as MadCap Flare offer drop-down menus as a versatile tool for technical writers. You can employ these menus to hide optional or additional information, organize copious amounts of content, or break down complex topics into more manageable parts. For instance, they’re useful when consolidating information into a single help topic with several collapsible menus, eliminating the need for multiple separate topics on a subject.
Below are some key reasons to use drop-down menus:
- Space Conservation: By condensing information into collapsible sections, writers can prominently present information while preventing the presence of large volumes of text.
- Progressive Disclosure: Drop-down menus facilitate progressive disclosure, revealing information gradually to users and allowing them to focus on relevant content while accessing additional details and conditional content as needed.
- Hierarchical Structure: By applying drop-downs to headings or section titles, writers can effectively illustrate the structure of content, signaling a clear and logical flow to users.
Benefits
Conserves space; reduces cognitive load; progressively discloses information; enables users to hide conditional content; presents content in a clearly labeled and structured manner.
Example

Language & Style
In this section, we will explore grammatical techniques for crafting clear, concise, and user-focused language while avoiding ambiguity and verbosity. Our aim is to employ simple and direct language that effectively communicates information to users in a straightforward manner.
Using the Simple Present Tense
In technical writing, opting for the simple present tense whenever possible significantly enhances the conciseness of instructions.
The simple present tense (e.g., select, clear, delete, navigate) is characterized by its straightforward use of the base form of the verb without conjugation to indicate time or duration, and it eschews complex and compound tenses such as the present progressive (e.g., am going) or the past perfect (e.g., had eaten)—or, even more daunting, the future perfect progressive (e.g., will have been studying).
This tense choice ensures clear, concise, and timeless instructions. By describing actions in the present tense, users can better visualize and understand the steps they need to take without grappling with the complexities of deciphering sentences like “The system will have been generating a report by the end of the fiscal year.”
Additionally, as users often perform tasks in real-time while reading the instructions, the present tense naturally aligns with procedural documentation.
Caveat
While the simple present tense is preferred for most instructions, please consider the context and purpose of the documentation. In some cases, using the appropriate tense for specific contexts, such as the past or future, is beneficial. For instance, describing past events or anticipating future changes may require the use of different tenses to accurately convey information.
Benefits
Provides clear, concise, and timeless instructions.
Examples
The verbs are underlined. Boldface items are UI elements users are instructed to interact with in some way; this is a common documentation practice.

Using the Active Voice
In general, using the active voice over the passive voice significantly enhances the clarity and directness of instructions.
The active voice clearly indicates who or what performs the action in a sentence, eliminating the ambiguity and confusion often associated with the passive voice. By emphasizing the subject as the doer of the action, instructions become more straightforward and easier for users to understand.
Consider the following sentence: “The report was generated.” In this passive construction, it’s unclear who or what generated the report.
Now, let’s clarify: “The report was generated by the system.” While this second sentence identifies the entity responsible for generating the report, it still retains the passive voice and adds unnecessary verbosity.
In contrast, the active voice provides clarity and conciseness: “The system generated the report.” Here, the subject (“the system”) is clearly identified as the performer of the action, resulting in a more direct and easily understandable sentence.
Caveat
The passive voice isn’t inherently bad—it has its purposes too! This includes situations where the object of the action is more important than the subject or when the subject is irrelevant or should be de-emphasized for user comprehension.
Benefits
Maintains concision and clarity, eliminating clunky verbiage created by the passive voice.
Examples
Using the Second Person
Typically, it’s best practice to address your users in the second person instead of the first person. This means using you or your instead of we, our, or us. By assuming that the user is the individual performing the tasks in your documentation, you create a user-centered approach that enhances clarity and engagement.
Addressing users directly with the second person fosters a sense of direct communication and resonates with their needs and perspectives.
Moreover, the second person helps maintain clarity and directness in instructions, leaving no room for ambiguity about who the instructions are intended for or who is expected to take action. This direct approach ensures that users understand their roles and responsibilities within the context of the software or task you are documenting.
Furthermore, because most step-by-step instructions use the active voice and imperative mood of the verb, the “you” is often implied: For example, “[you] select Save” or “[you] navigate to the main menu.”
Caveats
While the second person is generally suitable for user-oriented, actionable steps, there are technical writing contexts where the third person or active voice is preferred or even expected.
Maintaining objectivity and neutrality is crucial in scientific writing or regulatory documentation. The passive voice or third person may be more appropriate here to convey information without implying bias.
Additionally, if your documentation targets multiple audiences with distinct roles or perspectives, exclusive use of the second person may not effectively address all users. In such cases, a combination of the second and third person or a clear delineation of different user roles ensures clarity and inclusivity. The third person includes words like administrators, they, and users—instead of first and second pronouns like I, we, us, our, you, and your.
Benefits
Fosters a user-centered approach; engages the reader; maintains clarity and directness; reduces ambiguity.
Examples
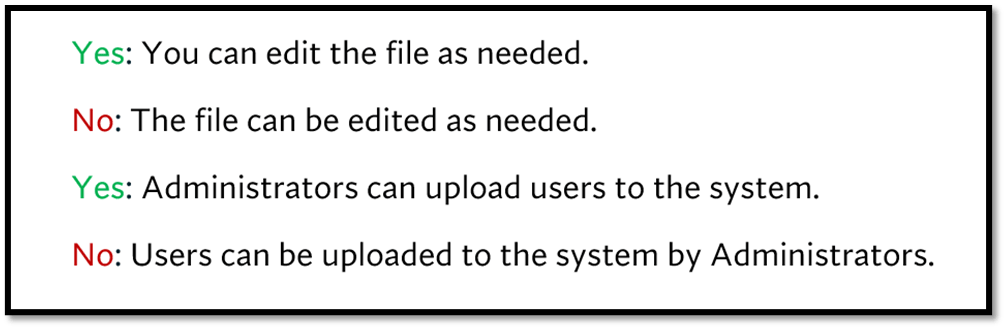
- As an Administrator, you can create, edit, and delete documents as needed.
- You can schedule surveys for a future publication date.
Using Strong Verbs & Nouns
In crafting instructional documentation, choose clear and precise verbs and nouns that convey actions and concepts effectively.
Phrasal verbs, for example, which consist of a verb and one or more particles (e.g., turn on, set up), can often be ambiguous or less specific than their single-word counterparts. By opting for more precise verbs, such as activate instead of turn on or configure instead of set up, you create concise and precise instructions.
Furthermore, avoid vague or informal verbs like pick and instead opt for verbs that accurately describe the action the user should perform. For example, if the user must use a mouse to choose an item, use select or click instead. Opting for precise verbs ensures that users understand exactly what action to take, reducing confusion and enhancing clarity in the instructions.
Similarly, clunky noun phrases can obscure meaning and make instructions more cumbersome to read. Instead of using lengthy noun phrases like “during the process of registration,” aim for concise and descriptive nouns that convey the same meaning with fewer words. For example, replacing “during the process of registration” with simply “during registration” maintains clarity while reducing unnecessary wordiness.
Benefits
Maintains clarity, concision, and precision.
Example
The noun and verb phrases are underlined.

Limiting Adjectives & Adverbs
While strong and precise nouns and verbs are favored in documentation, superfluous and verbose adjectives and adverbs are not.
Unlike marketing or advertising materials that may use subjective descriptions to evoke emotions, technical documentation should focus on conveying information clearly and straightforwardly. One way to achieve this is to limit the use of superfluous adjectives and adverbs that do not contribute to clarity or precision for the end user.
For instance, instead of using subjective adjectives like fantastic or amazing, strive for factual and objective descriptions. Similarly, avoid excessive adverbs like very or patiently that may slow down the reading pace without adding significant value to the content. By prioritizing clarity over embellishment, you ensure that users can quickly grasp the information they need without being distracted by unnecessary language.
Caveats
While minimizing superfluous adjectives and adverbs generally enhances clarity and conciseness, there are instances where descriptive language may be necessary for emphasis or context.
In technical documentation, particularly when describing user interfaces or user experiences, judicious use of descriptive language can provide valuable insights, highlight important features, or even protect users (e.g., Carefully review the information before submitting it for publication.).
Additionally, certain industries or domains may have specific stylistic conventions or audience preferences that warrant the inclusion of descriptive language. For example, in creative or user-centric software applications, a balance between clarity and engaging language might be necessary to maintain user interest and comprehension.
Benefits
Maintains concision, directness, and clarity.
Example
The superfluous adjectives and adverbs are underlined.


Nice I like that!
LikeLike
Great work!
Regards,
Diane Daughtry
LikeLiked by 1 person