
Writing is hard. Some people even find it intimidating. Writing can be challenging because it requires clear expression of thoughts and ideas, attention to detail, and effective communication. Writing is daunting for some because they struggle with articulating their thoughts, fear making mistakes, or lack confidence in their writing abilities.
But having a structured process for writing projects, such as essays or stories, helps divide the writing into manageable stages—and becomes increasingly important as projects grow larger and more complex. It promotes more coherent, cogent, and consistent writing. So, with practice and a structured writing process, many people can overcome their writing anxieties and become more confident and skilled writers.
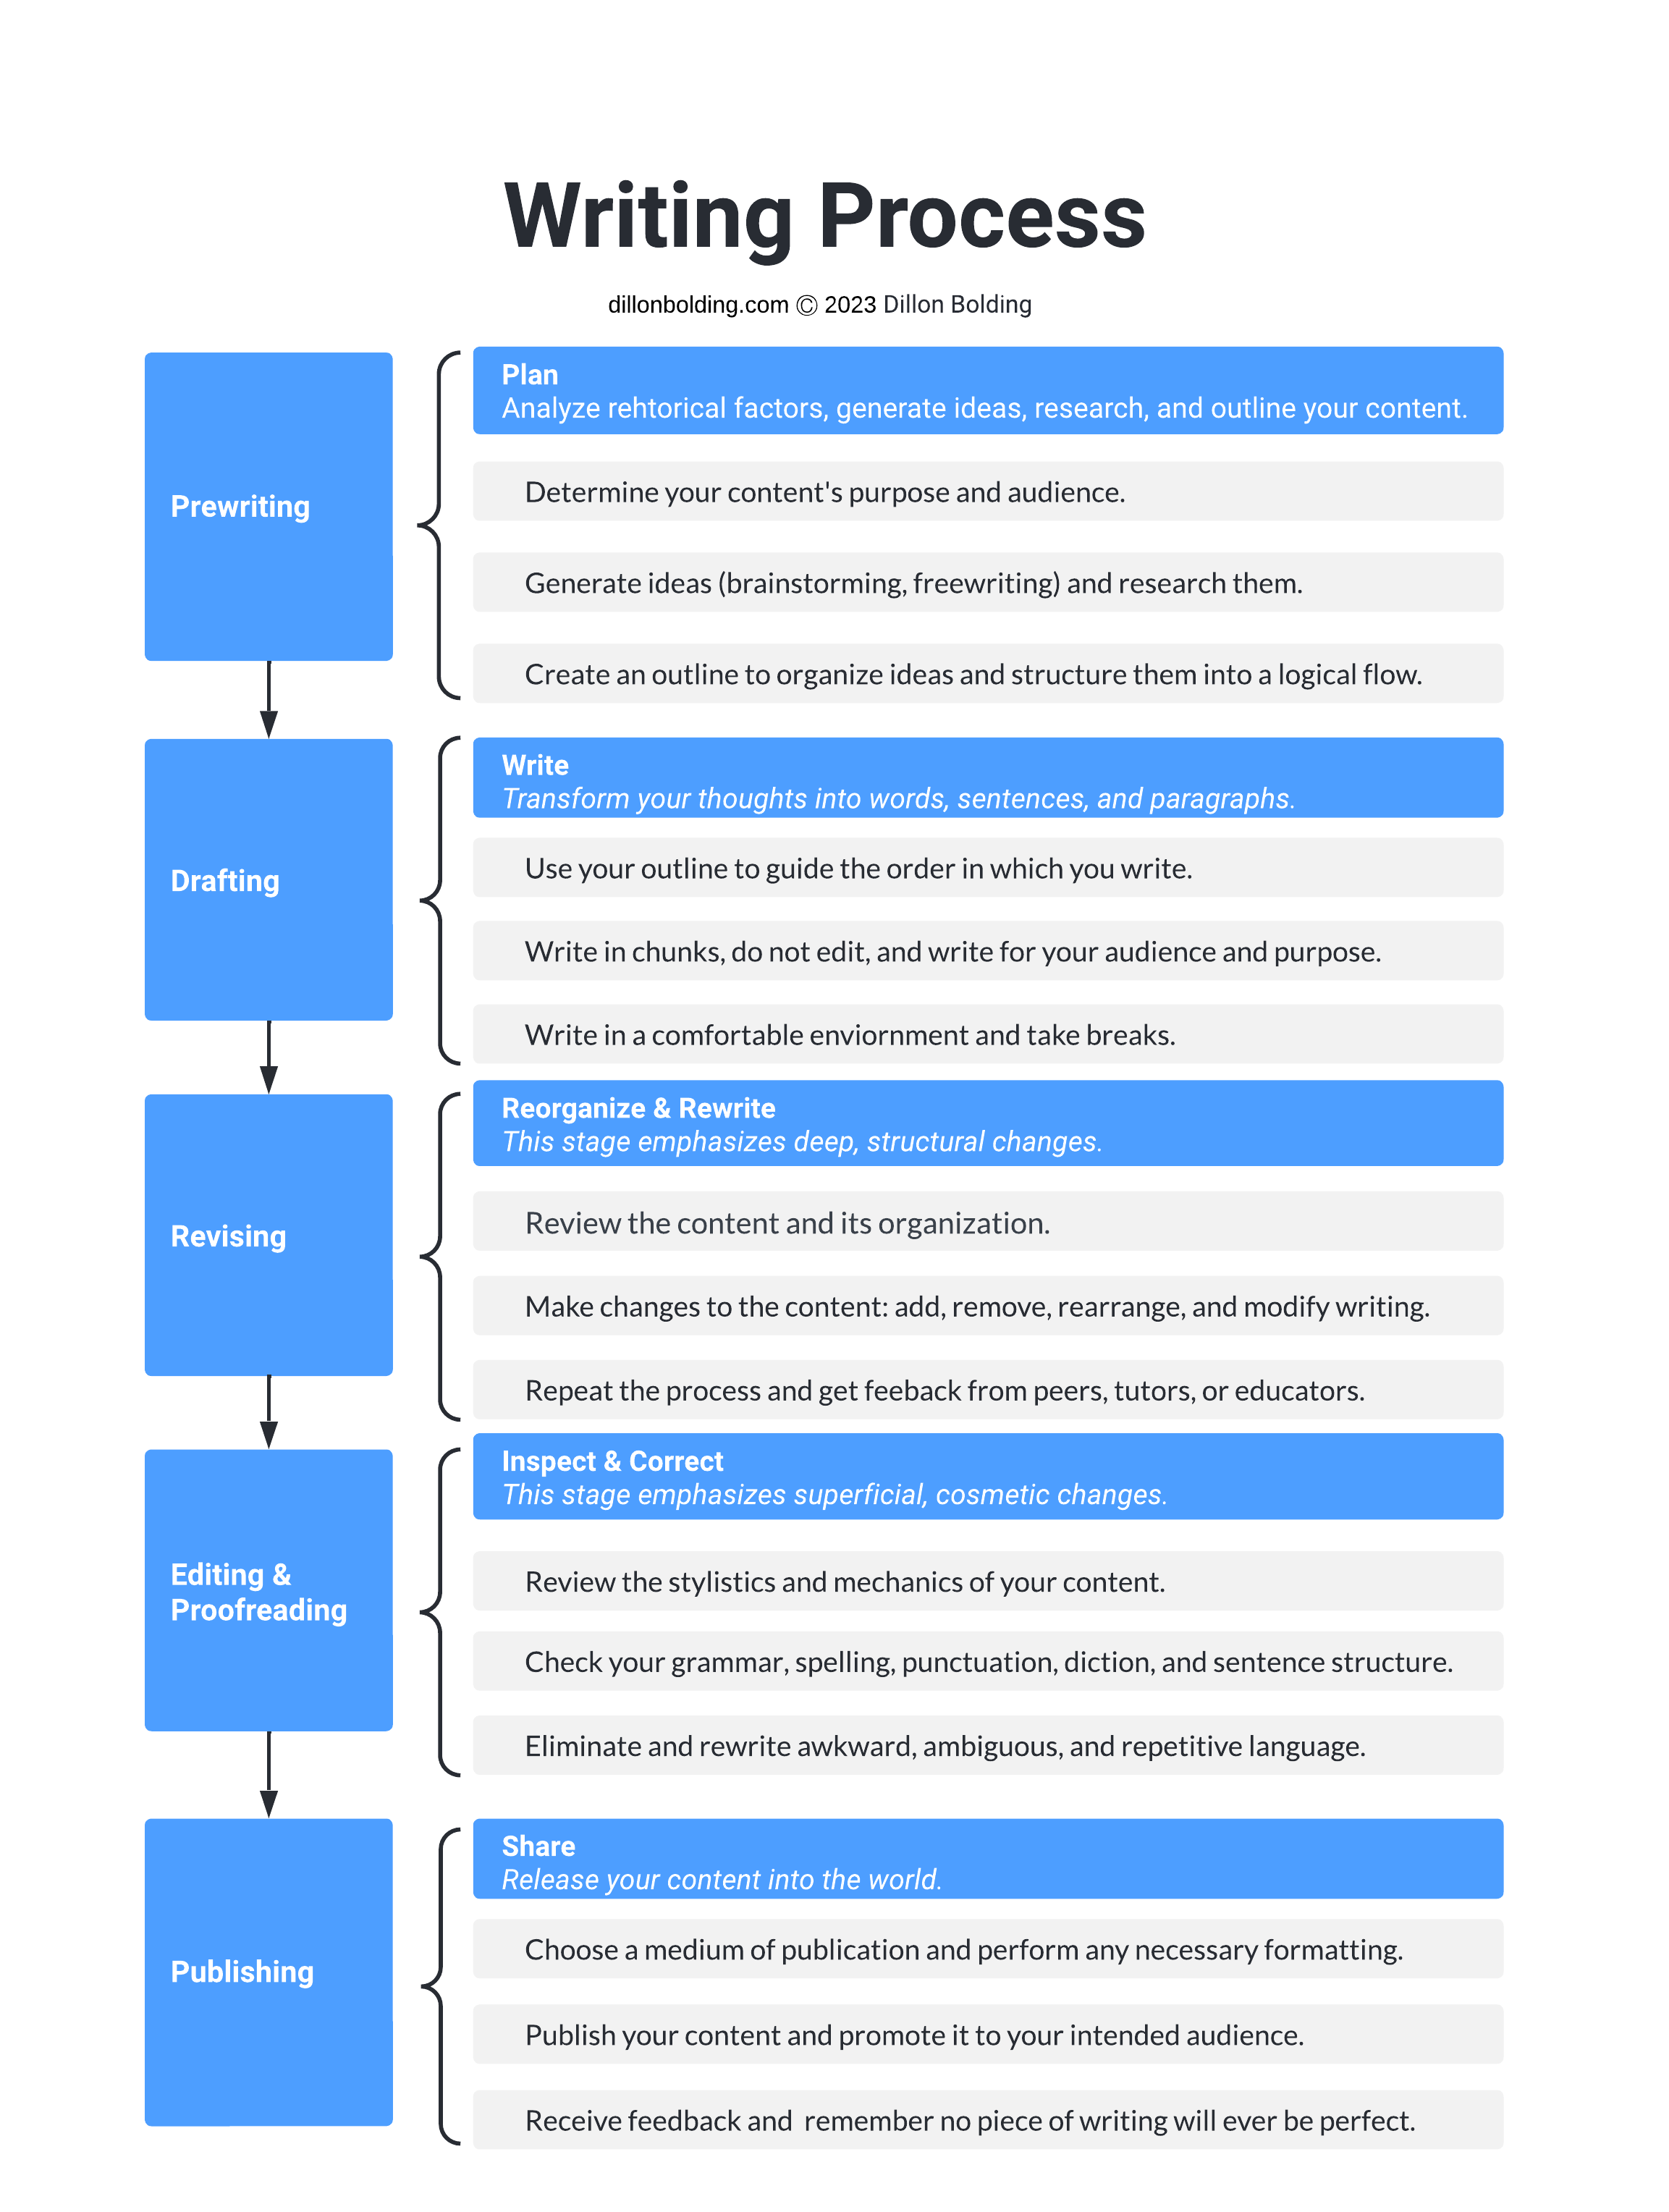
Here’s an analogy—the writing process is like building a house:
- Prewriting is like planning the house-building project—choosing the style and location of the house, selecting suitable construction materials, and creating a blueprint or floor plan.
- Drafting is like constructing the house’s foundation and framing.
- Revising is like adjusting the house’s design and materials as construction progresses.
- Editing and proofreading are like polishing the house’s interior and exterior before it’s ready for market.
- Publishing is like putting the house up for sale and making it available to the public.
This article defines each stage of the writing process, describes its significance and benefits, and explicitly details how to perform each stage. Despite the linear order in which the writing process is presented, it is a guideline—not a strictly linear process; it’s a flexible framework that can be adapted to suit each writer’s and project’s needs.
Prewriting
Prewriting includes any planning processes before you begin writing your content (i.e., drafting).
These processes include:
- Defining Purpose & Audience
- Generating Ideas
- Researching
- Outlining
Prewriting processes help generate, organize, and clarify ideas for your content—which supports a smoother and more efficient drafting stage.
Defining Purpose & Audience
First, define why you’re writing and identify your audience (i.e., readers). This will guide the direction and focus of your writing and ensure that your goals are clearly defined. The purpose and audience may be self-evident for simpler writing projects, but for more complex ones, an analysis of your purpose and audience is crucial.
To determine your purpose, you must answer the question:
- What do I want my content and message to accomplish?
To determine your audience:
- Consider whom you intend to address and understand their needs and expectations.
Assignment items like prompts, rubrics, and other guidelines often provide great insight into the intended purpose and audience.
Furthermore, by analyzing your purpose and audience, you can more easily determine how other elements will shape your content, including the context, tone, and style. Use all these elements to perform a rhetorical analysis: Determine your purpose, analyze your audience, understand the context in which you will deliver your content, and finally, choose a tone and style that will benefit those former three elements.
After performing a rhetorical analysis, you can make more informed decisions about the practicalities of composing your draft, for example: what vocabulary you’ll use (diction), how you’ll construct your sentences (syntax), and how you’ll assemble and organize your paragraphs (structure).
Harmonizing these rhetorical elements helps you accomplish your goals and create successful content. You should revisit these elements (and revise them, if needed) at every step of the writing process.
Generating Ideas
After you understand your intended audience and purpose for writing content, consider the specific topic(s) and possible theses you want to address. To do this, generate as many ideas as possible about your general subject or topic. If you need to determine a general subject or topic to write about, consider your purpose, audience, rubrics, prompts, and other guidelines to guide your generation of ideas.
There are two common methods for generating ideas: brainstorming and freewriting. (However, there are others, and I’ll list them below.) No matter your method, you’ll want to be creative, inquisitive, and non-judgmental. The purpose of generating ideas is to engage with your topic, enable free-flowing thoughts, formulate unconventional ideas, develop solutions, overcome writer’s block, and quickly generate many ideas in a brief period.
To brainstorm, list as many ideas as possible regarding your subject or topic. Don’t worry about using complete sentences or adhering to grammar, punctuation, and spelling rules. Let your ideas flow.
Freewriting is similar, except instead of listing ideas, you write for a set period using sentences and paragraphs. Again, don’t concern yourself with the mechanics and conventions of writing—just write freely about your topic.
Brainstorming and freewriting are like the primordial forms of a draft. They’re messy. They’re supposed to be. So, don’t be too evaluative about the ideas you list; you can narrow them down and sort them later. These two methods help you determine what you already know, what you want to learn, and what interests you about your subject or topic.
Other methods for generating ideas include:
- Mind Mapping: creating a visual diagram that connects ideas and concepts in a non-linear way
- Reverse Brainstorming: focusing on the problem instead of the solution and brainstorming ways to prevent it
- SCAMPER: a technique that involves asking questions to modify existing products or ideas to generate new ones
- Random stimulation: combining unrelated words or images to trigger innovative ideas
- SWOT Analysis: evaluating the strengths, weaknesses, opportunities, and threats of a problem to generate ideas
- Role-playing: assuming different perspectives to generate new ideas and solutions
- Design Thinking: a human-centered problem-solving approach that involves empathizing, defining, ideating, prototyping, and testing
- Delphi Method: a group decision-making process where experts provide anonymous opinions and iteratively reach a consensus
Researching
After you’ve generated ideas, research them. Researching is especially important if your content is scholarly or if you need supporting data, evidence, and arguments. No matter what you’re writing about, fill in your knowledge gaps. (Are you writing a fictional piece in which the setting is Maine, but you—the author—have never been there or know nothing about it? Then you should probably research Maine.)
Researching is all about finding, gathering, analyzing, evaluating, and sorting information—usually in that order—to develop a deeper understanding of your topic or subject, support your arguments, and ensure the accuracy of your content. Furthermore, it provides informative insights about the ideas you generated while brainstorming or freewriting. This will help narrow down your ideas because, as you research, you’ll realize that certain topics pique your interest and have the potential for developing engaging content.
To perform research:
- Refine your research questions: What information do you need to find to write your content?
- Select credible sources: Look for reliable, up-to-date, and relevant sources. This can include academic journals, books, government websites, and credible news sources.
- Take notes: As you read and gather information, take notes to help you track and analyze essential ideas and information.
- Evaluate the information: Consider the credibility, reliability, and relevance of each source and use only accurate and trustworthy information.
- Organize your information: Sort your notes and information into categories to help you see the overall summary and identify patterns and trends. This is essential for synthesizing ideas and creating an outline.
- Integrate the information: Incorporate the information you have gathered into your writing, ensuring you cite your sources properly and avoid plagiarism. (This will occur when you draft your content.)
- Document your sources: This is especially necessary if your writing requires scholarly evidence such as in-text citations, references, bibliography, or works cited. Additionally, having organized and documented sources enables you to incorporate them easily in your writing. Because citations are tedious, I recommend this citation builder: https://library.unc.edu/citationbuilder/
A Note on Theses
Students often attempt to develop a thesis (central argument or claim) before researching their topic. I advise against this. This is because good theses are supported by evidence gained through research. Determine a general topic or subject first, and then use assignment items to guide your research and development of a thesis.
If your content will present a thesis:
- Choose a topic: Start by choosing a topic that interests you and is relevant to your field of study or the purpose of your writing.
- Conduct research: Gather information on your topic through reading, observation, or interviews.
- Assess the information: Evaluate the information you have gathered and determine its meaning and the questions it raises.
- Narrow your focus: Refine your topic to a specific aspect that you can argue or analyze.
- Develop a thesis: This tentative statement summarizes your argument or claim.
- Refine the thesis: As you continue to write and develop your ideas, you may need to revise and refine your thesis to ensure it accurately represents your argument.
A strong thesis is clear, concise, and unambiguous, and it provides the basis for the rest of your argument.
Outlining
Outlines are maps that organize the flow of your content, including your ideas and all their details. It’s like the blueprint for a house.
Outlining generally occurs during the prewriting stage, but no set time or rule exists for when to create an outline, as it can be done at any stage of the writing process. Some writers prefer to create an outline before they start writing, while others find it more useful after writing a draft (called reverse outlining).
Reasons to use an outline:
- Identify the main ideas, sections, and supporting details
- Organize ideas and research into a logical, coherent structure
- Determine the relationship between ideas and how they connect (i.e., synthesis)
- Establish a clear and focused direction for the content
- Reduce writer’s block and enables a smoother drafting stage
To create an outline, organize your ideas and research into clear, meaningful arrangements and sequences that support your content’s purpose.
You can accomplish this in several ways, including a simple bullet-point list, a formal outline with Roman numerals, capital letters, and Arabic numerals, or even a visual mind map. The method used depends on personal preference and the type of writing.
To create an outline:
- Determine content: Determine the content’s purpose and main ideas. Ask yourself what you want to communicate and what information you need to include.
- Format: Decide the structure and layout of your outline.
- Identify main parts: Identify the main headings or sections of your content. These main headings will become the top-level items in your outline.
- Identify subparts: Break down the main headings into subheadings/subsections and supporting details. Determine which and how your ideas and research will be organized under each main heading.
- Add details: Add any additional details or notes to your outline, including specific examples, quotes, data, or other information that support your main ideas.
- Review: Review and revise your outline. Ensure your ideas are clearly organized and that the structure of your outline makes sense. Consider rearranging sections or adding or removing details as needed.
An outline is not a rigid plan; it’s an adaptable tool that can be modified as your writing progresses. Use it to create a clear, structured, coherent flow of content.
Drafting
Drafting is when you write your content. It’s an initial version of your writing, often called a draft, usually appearing in a rough, preliminary form.
Many consider this intimidating—the actual writing, putting words onto paper. But, if you’ve completed the prewriting processes, you’ll likely have an easier drafting stage—because you’ve determined your content’s purpose and audience, brainstormed ideas, researched them, and organized and structured them into an outline. Use these prewriting items to guide your writing. They’ll prevent writer’s block and feeling disorganized.
When you draft, you will transform your thoughts into sentences and paragraphs and create a structure and framework for your content.
To draft your content:
- Use your outline: The outline is a guide for the order in which to present your ideas and the content of those ideas. You can write content based on the order of your outline, or you can write different sections and then order them based on the outline.
- Reference your prompt and rubric: In addition to an outline, you can use these items as a checklist to ensure you’re addressing all the required parts of your content.
- Do not edit: Don’t worry too much about grammar, punctuation, or spelling at this stage. Instead, focus on getting your ideas down on paper.
- Write in chunks: You don’t have to write your entire draft in one sitting (unless you’ve procrastinated, of course!). Instead, break up the writing into manageable chunks. For example, set goals to write a certain number of paragraphs or a specific section of your paper.
- Use transitions and headings: To create good coherence, flow, and pacing, use transitional words/phrases and headings to separate and connect your ideas and paragraphs.
- Write in a comfortable environment: Some people write while jamming to music. Some people need a quiet place with ambient lighting. Create an environment that is conducive to you.
- Write to your audience and purpose: When drafting your writing, consider your audience and purpose. Use appropriate language and examples for your readers, and write in a tone and style that will resonate with them and achieve the goals of your content.
- If you become lost, confused, or unmotivated: Refer to your audience, purpose, brainstorming, research, outline, prompts, rubrics, and assignment items. Writing can be difficult. It’s a complex mental process. So, take it easy.
- Take breaks: This helps clear your mind and return with a fresh perspective.
You may notice several issues as you compose your draft:
- Readability issues: e.g., overall problems with your thesis, main ideas, and messaging
- Structural issues: e.g., logical gaps and inconsistencies in your thoughts, arguments, and evidence.
- Language issues: e.g., awkward wording, the flow of ideas, and incorrect grammar and punctuation.
Despite those issues, remember this: Do not be critical of your writing when you create your first draft. Do not concern yourself with readability, structural, or language issues. Be a writer first; be an editor second.
Revising
After you’ve written the first draft of your content, you might (and I highly recommend) revise it. Revising focuses on the development and structure of the content before addressing more cosmetic issues such as sentence- and word-level concerns. For example, during this stage, you might significantly rewrite and reorganize the content instead of fixing grammar and punctuation.
Revising is a critical step of the writing process because it aims to improve the draft’s overall quality, style, and structure, making the content more effective, engaging, and persuasive. Without this step, you miss the opportunity to add new ideas, strengthen your arguments, and improve the content’s flow, credibility, originality, and clarity.
Topics and issues you might address during the revising stage:
- The draft’s global structure, overall message, and readability
- Arrangement and flow of ideas, sections, and paragraphs
- Ways to improve audience engagement
- Development and placement of graphics and figures
- Plagiarism and originality
- Logical gaps, factual inaccuracies, insufficient evidence or details
- Repetitions, redundancies, and rambling
To revise your content:
- Take a break: After completing the drafting stage, let the draft sit for a while before you begin to revise.
- Review the content: Read through the content and evaluate whether it achieves your purpose, meets your audience’s needs, suits your context (method of delivery or form of publication), and employs an appropriate tone (attitude from the author) and style (vocabulary and sentence structure). Identify any of these areas where you can strengthen or clarify your content.
- Review the organization: Review the sequence, arrangement, and flow of ideas. For example, you might check your introduction, conclusion, thesis, headings, and paragraphs and identify any repetitive, ineffective, incoherent, or illogical sections.
- Make changes: After you review the content and its organization, start revising. Add, remove, rewrite, or reorder sections, paragraphs, and sentences. Refer to the list of revising topics above. First, you might reorder your content’s sequence, and then second, you can address your content issues by changing the actual writing.
- Get feedback: After composing an initial draft, consider receiving feedback from peers, instructors, a writing group, or a writing tutor. This can help you identify areas for improvement and strengthen your writing. You might prefer receiving feedback after you complete revising and editing.
- Repeat the process: After incorporating the feedback and making the necessary changes, repeat the revising stage until you are satisfied with your revisions. No writing will ever be perfect, but a few rounds of revision can improve its quality.
Remember that revising includes changes that are usually deep and structural, while editing encompasses superficial, cosmetic changes that help polish the draft.
Editing & Proofreading
After revising your content, you can concentrate on superficial and cosmetic concerns by editing and proofreading. While revising addresses global, big-picture problems, such as by adding and removing entire paragraphs, editing and proofreading focus on improving individual sentences, phrases, and words in the content.
Editing and proofreading are vital because they ensure your content is presented professionally and free of errors and inconsistencies. They also improve the syntax (structure), semantics (meaning), and diction (word choice) of your sentences. Think of this stage as the clean-up crew; they make your writing presentable for your audience and context.
Note: Editing and proofreading are technically two separate stages of the overall revision and editing process. (For example, the revising stage of the writing process includes developmental and structural editing, while the “editing” that most people think of can be delineated into two types: line editing and copyediting).
Below, editing and proofreading are defined as separate substages of the writing process.
Editing
One-half of editing involves improving diction and modifying sentence structures to benefit your audience and purpose. This is referred to as stylistics (e.g., clarity, transitions, and diction). The second half of editing includes correcting the technicalities of your writing. This is called mechanics (e.g., grammar, spelling, and punctuation). Generally, you should first address the stylistics and then fix the more mechanical aspects.
Below are stylistic and mechanical elements to consider when you edit your content:
- Transitions between paragraphs and sentences
- Ambiguous, awkward, repetitive, and cliché language
- Grammar, punctuation, spelling, and capitalization
- Clarity, consistency, accuracy, and precision of language
- Rhythm, cadence, lucidity, complexity, and length of paragraphs and sentences
To edit your content:
- Read your content aloud: This helps identify awkward or unclear phrasing and grammatical errors, as well as other issues that may be difficult to spot when reading silently.
- Use an AI writing assistant: They suggest style changes and correct mechanics.
- Check transitions: Use transitional words, phrases, and sentences between sections and paragraphs to ease the shift between topics and help guide your audience through your ideas.
- Eliminate repetitiveness: Scan your content for repetitive words and phrasing, use synonyms to vary the diction, and eliminate redundant expressions. This keeps your writing fresh and unencumbered.
- Rewrite unclear, awkward, or cliché phrasing: Often, using the active voice and strong verbs can make your writing clearer and more engaging. Replacing vague and overused words and phrases with precise and accurate language makes your writing more appealing.
- Check diction: Ensure your choice of vocabulary is appropriate for your content and audience. For example, an academic research paper and a social media advertisement will likely employ different vocabularies to appeal to different audiences.
- Check sentence length: Vary sentence structures to control the ebb and flow of your content. For example, use shorter sentences to create a sense of urgency and directness; use longer sentences to slow the pace and offer more depth and complexity.
- Check punctuation: Ensure you employ punctuation marks correctly because they are abundantly useful to master. They help control the flow and pace, subtly emphasize or deemphasize information, and add clarity to phrasing that would otherwise be confusing without them.
- Check grammar: Ensure your content employs appropriate grammar for its audience. Proper grammar has several benefits: It creates professionalism and credibility and reduces ambiguity and confusion.
- Get feedback: You might choose to receive feedback at this stage instead of during the revising stage.
- Repeat the process: Like the revising stage, several rounds of editing help ensure your content is clear of language mishaps.
Proofreading
Proofreading is the final review of your content to ensure it is error-free and ready for publication. During this process, you inspect the microscopic elements of your content and confirm it is correctly formatted. It’s like a dress rehearsal before the performance.
Items to identify and correct while proofreading:
- Incorrect spelling
- Improper capitalization
- Inconsistently formatted text (underlining, bold-face, italics)
- Inconsistently formatted headings, headers, footers, and page numbers
- Superfluous spaces between words, letters, and punctuation
- Transposed letters and words
- Incorrect word usage (e.g., homonyms)
- Missing words or punctuation
- Sentence fragments, run-on sentences, and incorrect subject-verb agreement
Proofreading can seem tedious as it requires concentration to catch and correct minor mistakes. But it ensures your content is consistent and professional.
To proofread:
- Read backward: Reading your content backward helps you to slow down and carefully navigate each sentence for errors.
- Use a printed copy: Print a copy of your content and use a pen to mark errors. This creates a more physical connection with the content, enabling you to identify the mistakes easily. Plus, it gives you a fresh perspective and reduces distractions from devices. In fact, research shows that people tend to read more carefully and comprehensively with printed content.
- Address one type of error at a time: This keeps you focused and diminishes the likelihood you’ll be overwhelmed while reviewing.
- Seek help: Just like with revising and editing, an AI writing assistant and another human can help you identify errors that might be invisible to you.
Publishing
Publishing is the stage in which you release your content into the world, whether you post it on a blog or LinkedIn, turn it in to a professor or teacher, publish it in an academic journal, or deliver it to a team of business executives. Additionally, during this stage, you might perform a final round of proofreading and prepare the formatting for its various forms of publication.
Ultimately, when you publish content, you add to the discourse of your topic.
To publish:
- Select a medium: Decide how you want to publish your content. Will it be in print or online? Will you self-publish, or will you work with a publisher? As addressed in the first prewriting process (defining audience and purpose), the context (the discourse in which your content situates itself) sometimes changes during the writing process. So, consider your medium at the beginning and end of the writing process.
- Publish content: Submit your content to the appropriate places for publication. This could include submitting it to a literary magazine, publishing it on a personal blog, or uploading it to social media.
- Promote content: After publication, promote the content to your intended audience. Share it on social media, email it to friends and family, or discuss it in professional networks.
Publishing can either be relieving or overwhelming. (Students are often relieved to have a paper submitted and done with, while a scientist might be nervous about what his colleagues think of his new study). Either way, I will reiterate: No essay, no journal article, no poem, no story, or any other piece of written content will ever be perfect, especially in the eyes of all those who will encounter it. You’re often your own worst critic, anyway.
Publishing is exciting because you can share your ideas, art, efforts, skills, and craft with the world. It welcomes feedback. It cultivates opportunities.
But I’ll say it again: Writing is hard. Ambiguity isn’t always easy to remedy. Logic isn’t always so straightforward. Creativity isn’t always so forthcoming. So, even if your writing isn’t perfect, keep going. Use a process and practice writing—it helps immensely.
